A Raspberry Pi home lab can run a surprising number of workloads: automation servers, media managers, self-hosted apps, and more. Most of them share one critical dependency — a database; PostgreSQL or MongoDB instances quietly grows months of data, and the failure mode can be: a dead SD card, a failed OS upgrade, or an accidental docker volume rm.
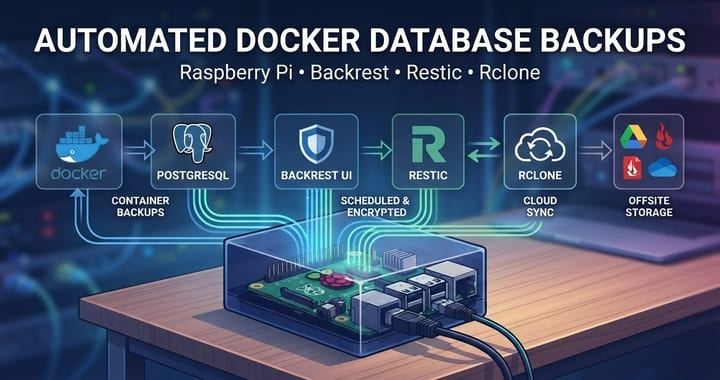
This guide solves the problem that is explained above. We will build a fully automated, encrypted, deduplicated backup pipeline that:
- Triggers logical database dumps (not raw volume snapshots) before each backup run.
- Stores those dumps in a Restic repository for deduplication and client-side encryption.
- Replicates the repository to Google Drive via Rclone.
- Orchestrates the whole process through Backrest — a self-hosted UI wrapper around Restic that runs as a Docker container.
The result is a “set it and forget it” system that you can verify, test restores from, and extend to any additional services in your stack.
Architecture Overview
The Three-Layer Stack
Restic is the core backup engine. It handles deduplication (so consecutive daily snapshots do not waste space storing identical file chunks), client-side AES-256 encryption, and snapshot management. Every backup produces an immutable, verifiable snapshot.
Rclone is a Swiss-army-knife command-line cloud transfer tool. It speaks over 40 storage protocols natively, including Google Drive. Restic integrates with Rclone as a backend, which means Restic handles all encryption locally before a single byte is sent to the cloud. Then Rclone send the data to the cloud storage.
Backrest is a web UI and scheduler built on top of Restic. Instead of managing cron jobs and shell scripts manually, you configure plans, retention policies, and hooks through a dashboard. Critically for this use case, Backrest supports pre-backup and post-backup hooks — arbitrary shell commands that run inside the Backrest container (or via docker exec into a sibling container) before Restic starts the snapshot. This is the mechanism we use to generate consistent database dumps.
Conceptual Data Flow
┌─────────────────────────────────────────────────────┐
│  Backrest Scheduler (cron)                          │
│                                                     │
│  1. Pre-Backup Hook (CONDITION_SNAPSHOT_START)      │
│     └─ sh -c "docker exec -e PGPASSWORD='***'       |
|           -t container-name pg_dump -Fp             |
|           -U user dbname > /userdata/postgres.sql"  │
│     └─ sh -c "docker exec container-name mongodump  |
|           --archive --username user --password ***  |
|           --authenticationDatabase admin            |
|           > /userdata/mongo-backup.archive"         │
│                                                     │
│  2. Restic Snapshot                                 │
│     └─ restic backup /userdata                      │
│        (deduplication + AES-256 encryption)         │
│                                                     │
│  3. Restic → Rclone backend → Google Drive          │
│     └─ rclone:gdrive:restic-backups                 │
└─────────────────────────────────────────────────────┘
The backup volume (/userdata) is a temporary staging area mounted into the Backrest container. Hooks write dump files there; Restic snapshots it. Because Restic deduplicates at the chunk level, even large databases result in efficient incremental uploads after the first run.
Why Logical Dumps Instead of Volume Snapshots?
A file-level snapshot of a running database volume is not a consistent backup. PostgreSQL and MongoDB both maintain in-memory state and use write-ahead logs. Copying raw files while the database engine is writing will produce a snapshot that may be internally inconsistent — it can fail to restore, or restore to a corrupted state. You would only discover this on the day you need it most.
A logical dump (pg_dump, mongodump) is a backup of the logical content of the database. The database engine serializes its own state into a portable, self-consistent archive. This is the safe path for production databases, and it is what pg_dump and mongodump --archive produce. The resulting files are also database-version-portable, making migrations easier.
Use file-level volume snapshots for stateless application data (configuration files, static assets). Use logical dumps for databases.
Step 1: Rclone Configuration — Google Drive Remote
Backrest needs an Rclone configuration to know where to send snapshots. Configure Rclone first so the path is ready when you deploy Backrest.
Option A: OAuth (Interactive, Simpler)
On a machine with a browser (your laptop, not the Pi), run:
rclone config
Follow the prompts:
n) New remote
name> gdrive
Storage> drive          # Google Drive
client_id>              # Leave blank to use Rclone's shared credentials
client_secret>          # Leave blank
scope> drive.file       # IMPORTANT: least-privilege scope
root_folder_id>         # Leave blank
service_account_file>   # Leave blank for OAuth
Edit advanced config?> n
Use auto config?> y     # Opens browser for OAuth consent
Scope:
drive.file— This scope restricts Rclone to only files it creates. It cannot read, modify, or delete any other files in your Drive. Always prefer this over the fulldrivescope.
Copy the resulting rclone.conf to your Pi:
scp ~/.config/rclone/rclone.conf pi@raspberrypi:~/backrest/rclone/rclone.conf
Option B: Service Account (Headless, Recommended for a Pi)
For a truly unattended setup, a Google Cloud Service Account eliminates the need for OAuth tokens that expire or require re-authorization.
- Create a project in Google Cloud Console.
- Enable the Google Drive API.
- Create a Service Account, download the JSON key file to your Pi.
- Share a specific Google Drive folder with the service account’s email address (e.g.,
backup-agent@your-project.iam.gserviceaccount.com).
In rclone.conf:
[gdrive]
type = drive
scope = drive.file
service_account_file = /config/rclone/service-account.json
root_folder_id = <folder-id-from-drive-url>
The Service Account approach is superior for a headless Pi: no browser required, no token refresh failures.
Verify the Remote
rclone lsd gdrive:
This should return an empty listing (or the contents of the shared folder if you created any). A working Rclone remote is the prerequisite for all remaining steps.
Step 2: Backrest Deployment
Backrest runs as a Docker container. The docker-compose.yml below is designed for an ARM64 Raspberry Pi running Docker in rootless or standard mode.
Create the following directory structure on your Pi:
/root/backrest/
├── docker-compose.yml
├── config/              # Backrest persistent config (repo keys, plans)
├── cache/               # Restic cache (speeds up subsequent operations)
└── rclone/
    └── rclone.conf      # (or service-account.json if using SA)
docker-compose.yml:
services:
  backrest:
    image: ghcr.io/garethgeorge/backrest:latest
    container_name: backrest
    hostname: backrest
    volumes:
      - ./backrest/data:/data
      - ./backrest/config:/config
      - ./backrest/cache:/cache
      - ./backrest/tmp:/tmp
      - /root/backrest/rclone:/root/.config/rclone # Mount for rclone config (needed when using rclone remotes)
      - /root/backrest/data:/userdata  # Mount local paths to backup
      - /root/backrest/repos:/repos     # Mount local repos (optional for remote storage)
      # The "God Mode" connection to run commands inside other containers
      - /var/run/docker.sock:/var/run/docker.sock
    environment:
      - BACKREST_DATA=/data
      - BACKREST_CONFIG=/config/config.json
      - XDG_CACHE_HOME=/cache
      - TMPDIR=/tmp
      - TZ=Europe/Istanbul
    ports:
      - "9898:9898"
    restart: unless-stopped
Why mount the Docker socket?
The pre-backup hooks run inside the Backrest container. To trigger pg_dump inside a separate postgres container, the hook must be able to call docker exec. Mounting /var/run/docker.sock grants the Backrest container access to the host Docker daemon.
Security note: Mounting the Docker socket is equivalent to granting root access to the host. Ensure the Backrest UI is never exposed to the public internet without authentication. Run it behind a reverse proxy with strong credentials, or bind it exclusively to
127.0.0.1.
Start the stack:
cd /root/backrest
docker compose up -d
docker compose logs -f backrest
Access the Backrest UI at http://raspberrypi:9898 to complete initial setup.
Step 3: Configuring the Restic Repository in Backrest
In the Backrest UI, navigate to Repositories → Add Repository.
| Field | Value |
|---|---|
| Repository URI | rclone:gdrive:restic-backups |
| Password | A strong, randomly generated password |
Critical: Save the repository password somewhere outside the backup system itself — a password manager, a printed copy in a safe. If you lose this password, the repository contents are unrecoverable. This is the correct trade-off: the encryption means Google (or anyone who accesses your Drive) cannot read your data.
Backrest will call restic init on first save, initializing the repository structure in Google Drive.
ARM64 Performance Note: The initial backup of a large Restic repository over Google Drive can be slow on a Pi’s CPU due to encryption overhead. Subsequent incremental backups are fast because deduplication means only changed chunks are uploaded. Plan the first run to occur overnight.
Step 4: Implementing Pre-Backup Hooks
This is the most operationally important part of the guide. Hooks run before Restic starts snapshotting, ensuring the dump files in /userdata are fresh and consistent every time.
In the Backrest UI, navigate to your plan and add Pre-Backup Hooks. Choose CONDITION_SNAPSHOT_START from dropdown.
PostgreSQL — pg_dump
sh -c "docker exec -e PGPASSWORD='***' -t container-name \
      pg_dump -Fp \
      -U user \
      dbname > /userdata/postgres.sql"
Tip: Use
-Fcfor larger databases. The plain text format (-Fp) is human-readable and portable, but the custom binary format (-Fc) offers two practical benefits for this backup pipeline:Restore performance —
-Fcdumps support parallel restore viapg_restore -j $(nproc). On a Pi’s limited CPU, this can cut restore time by hours for multi-GB databases.To switch, replace
pg_dump -Fpwithpg_dump -Fcand usepg_restoreinstead ofpsqlduring restoration (see the restore section for reference).
MongoDB — mongodump with Archive Format
The --archive flag streams the dump to a single file, which is far more efficient to snapshot than a directory of BSON files.
sh -c "docker exec container-name \
      mongodump --archive \
      --username user \
      --password *** \
      --authenticationDatabase admin \
      > /userdata/mongo-backup.archive"
Verifying Hook Execution
After running a plan manually via the UI, check the Backrest task log. A successful hook run will show the echo output from your scripts. If docker exec fails with a permission error, verify that /var/run/docker.sock is mounted and that the Backrest container’s user has read/write access to the socket.
# On the Pi host, check socket permissions
ls -la /var/run/docker.sock
# Expected: srw-rw---- 1 root docker ...
# Backrest container must run as root or a user in the docker group
Step 5: Configuring Retention Policy
The Retention Policy defines the lifecycle of your snapshots, dictating which backups should be preserved and which should be marked as obsolete.
You can configure this within your Backup Plan settings. Depending on your needs, you can choose between:
- By Count: Ideal for maintaining a specific number of recent versions.
- By Time Period: Allows for more complex granular retention, such as keeping daily backups for two weeks, weekly backups for two months, and monthly backups for half a year.
Step 6: Validating Backups and Performing a Restore
A backup you have never tested is not a backup. Build restore verification into your routine.
Checking Repository Integrity
Restic’s check command verifies the repository’s structural integrity and optionally reads a subset of data to confirm no corruption has occurred during upload.
From the Backrest UI, you can trigger a Check operation directly. Alternatively, from the command line:
docker exec backrest restic \
  -r rclone:gdrive:restic-backups \
  check --read-data-subset=10%
--read-data-subset=10% reads a random 10% of pack files each run. Over 10 runs you have statistically verified the entire repository without the cost of downloading everything each time. This is the right cadence for a Pi on a home internet connection.
Restoring a PostgreSQL Database
Step 1: List available snapshots
docker exec backrest restic \
  -r rclone:gdrive:restic-backups \
  snapshots
Step 2: Restore the sql dump file from a specific snapshot
docker exec backrest restic \
  -r rclone:gdrive:restic-backups \
  restore <snapshot-id> \
  --target /tmp/restore \
  --include /backup/postgres/
Step 3: Load the sql dump into PostgreSQL
# Copy the restored sql dump into the running postgres container
docker cp /tmp/restore/backup/postgres/mydb_<timestamp>.sql \
  postgres_container:/tmp/mydb_restore.sql

# Restore using pg_restore
docker exec postgres_container \
  psql \
    -U postgres \
    -d mydb_restored \
    -f /tmp/mydb_restore.sql
Restoring a MongoDB Database
# Restore the archive from the snapshot
docker exec backrest restic \
  -r rclone:gdrive:restic-backups \
  restore <snapshot-id> \
  --target /tmp/restore \
  --include /backup/mongo/

# Load the archive into MongoDB
docker cp /tmp/restore/backup/mongo/mongo_<timestamp>.archive \
  mongo_container:/tmp/mongo_restore.archive

docker exec mongo_container \
  mongorestore \
    --username="$MONGO_INITDB_ROOT_USERNAME" \
    --password="$MONGO_INITDB_ROOT_PASSWORD" \
    --authenticationDatabase=admin \
    --archive=/tmp/mongo_restore.archive \
    --drop   # drops existing collections before restoring — omit if you want a merge
Best Practices and Considerations
Keep Encryption Keys Separate from the Backup Destination
Your Restic repository password is the only thing protecting your encrypted backups. If it is stored in the same Google Drive account where the repository lives, an attacker who compromises the account has both ciphertext and key. Store the repository password in:
- A dedicated password manager (Bitwarden, 1Password).
- A separate encrypted file stored offline.
- A secrets manager if you are integrating this into a larger infrastructure.
Never commit the password to a Git repository, even a private one.
Use Separate Google Drive Accounts for Backup
The Service Account approach (Option B) naturally enforces isolation: the service account has access only to the specific folder you shared with it. Your primary Google account is not involved in the backup process and cannot be used to access the repository even if compromised.
Alerting on Failure
Backrest supports post-backup hooks that run conditionally on failure. Configure one to send a notification (via a webhook to a Slack channel, n8n workflow, or ntfy instance) when a backup plan fails:
#!/bin/sh
# Post-backup failure hook
curl -s -X POST \
  -H "Content-Type: application/json" \
  -d "{\"text\": \"Backup FAILED on $(hostname) at $(date)\"}" \
  "$SLACK_WEBHOOK_URL"
Silently failing backups are the most dangerous failure mode. Alerting converts silent failures into actionable notifications.
Conclusion
A Raspberry Pi home lab is a genuinely capable platform for running production-like workloads, but it demands the same operational discipline as a cloud environment — arguably more, given the hardware’s failure-proneness.
The pipeline described here — Backrest orchestrating pre-backup hooks that generate logical database dumps, Restic snapshotting and encrypting those dumps, and Rclone shipping them to Google Drive — delivers the properties that make a backup system trustworthy:
- Consistency: Logical dumps are always internally consistent, regardless of database write activity.
- Confidentiality: Data is encrypted client-side before leaving the Pi. Google cannot read it.
- Efficiency: Restic deduplication means daily backups of a 500 MB database do not consume 500 MB × 365 days of Drive quota.
- Verifiability:
restic checkand periodic test restores confirm the backup is actually usable. - Auditability: Backrest’s task history gives you a complete log of every backup run, hook output, and error.
Once this is running, the operational overhead drops to near zero. Review the Backrest dashboard weekly, run a test restore monthly, and rotate your repository password annually. The rest is automated.
Your databases are safe. You can sleep.
References
- Restic Design Documentation: https://restic.readthedocs.io/en/latest/100_references.html
- Rclone: https://rclone.org/
- Rclone Google Drive: https://rclone.org/drive/
- Backrest Docs: https://garethgeorge.github.io/backrest/introduction/getting-started